|
|

|
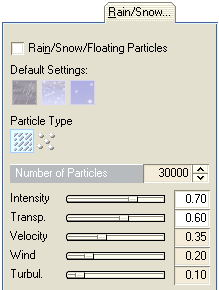
| On the "Rain/Snow..." page of the atmospheric background model you can switch on a particle effect to simulate rain (stripes) or snowflakes or, e.g., floating particles in the water. The particles are generated after the rendering of the picture in post processing mode.
|
|
|

|
| The illustration above shows some details from a small demo animation you can admire in the internet gallery at www.3d-designer.com. Snowfall is setting in - covering the landscape with a pretty white coat. To achieve this effect also material animation of the terrain texture layers was applied.
|
|
|
| The parameters:
|
|
|
| Initialize Standard Settings
|
|
|
| Particle Types
|
|
|

|
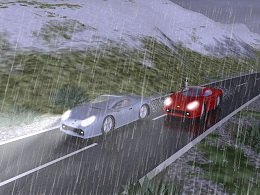
| Example for rain particles, rendered by Pascal Heußner.
|
|
|
| Number of Particles - The number of generated particles for the weather effect. This number can also be zero. This is useful, if you want to start the effect at a later time in the animation. Example: You want the rain to set in at frameposition 100 with a few rain drops. On the following 100 frames up to frameposition 200 the rain becomes stronger. Then it rains with constant intensity up to frameposition 400 and finally the rain decreases again to zero raindrops on framepostion 500. To realize this animation you simply have to move on the corresponding frame positions and adjust the number of particles for the weather effect. Each time you change one of the parameters that can be animated in the background dialog (indicated by an emphasized background color of the edit field), automatically a new parameter-keyframe is generated for the animation. The settings could be as follows:
|
| · | Frame 1, Particles 0 - No rain, yet.
|
| · | Frame 100, Particles 0 - The rain will begin to start here. Since no changes of the parameters have been made on this frameposition, we have to manually add a new key in the animation editor. Simply select the background object in the animation editor and add a parameter track and then operate <Add Key>.
|
| · | Frame 200, Particles 10000 - The particle stream increases from 0 particles in frame 100 to 10000 particles in frame 200.
|
| · | Frame 400, Particles 10000 - Between frameposition 200 and 400 a constant stream of 100000 particles is generated. Again, no change is made in the background dialog, so just add a key in the animation editor for the parameter track of the background object. This keyframe marks the point, from which the particle stream decreases again.
|
| · | Frame 500, Particles 0 - The rain stops.
|
|
|
| Intensity and Transparency - This parameters control the intensity and transparency of the particles. Of course rain stripes appear more transparent and less intense than shiny snow flakes. But a high transparency value can also be useful for the rounded particle type, for instance, for floating underwater particles. Or think of somewhat hazy weather situation, where the snow flakes become blurred with the background.
|
|
|
| Velocity - controls the rate of fall for the particles.
|
|
|
| Wind and Turbulence - The speed of the wind is combined with the rate of fall. The wind direction is given by the wind direction of the first cloud layer defined on the clouds page of the atmospheric background model. Turbulence adds some chaos to the particle stream which is especially useful for the snowfall.
|
|
|
| Rendering of an Preview Animation
|
| In contrast to the particle systems based on real 3D-objects, the weather particles are rendered very fast in post processing, after the rendering of a picture. It is recommendable therefore, to switch off all unnecessary scenery objects, including clouds and other time consuming effects, and to render complete preview animations only of the weather effect. Test and change all parameters accordingly, especially the number of particles, velocity, wind and turbulence, before you switch on again all scenery objects and effects for the final rendering.
|


